Adding texture to the surface of a plastic injection molded part, whether it’s to a portion of the surface or to the entire mold, can serve numerous purposes, including: improved grippability, enhanced ergonomics, hidden parting lines or cosmetic defects, and better aesthetics. For example, handheld tools often have texture applied to make them easier to grip, and automotive dashboards may be textured with a faux wood appearance. Texture can make stickers and paint adhere more readily, or make parts more resistant to scuffs and abrasion. And finish options range from polished to grained, from pebbled to matte, glossy, or hazy—and many more.
Available texturing options fall under one of two umbrellas: standard or Mold-Tech™. For the former choice, SPI finishing standards are outlined in the included chart (Fig 1). (SPI is the Society of the Plastics Industry, now known as the Plastics Industry Association.) Most of these finishes are applied by hand to mold surfaces after machining, through methods like stoning, polishing, or bead-blasting, and occasionally EDM (electrical discharge machining).
Let’s consider the results of a couple of these listed combinations. For instance, SPI-A2, which is a grade #2 of Diamond Buff, produces a shiny, high-gloss finish on most materials. Alternatively, SPI-C1 is applied using a 600-grit stone, and it offers a dull, matte finish. Fig 2 illustrates these examples.
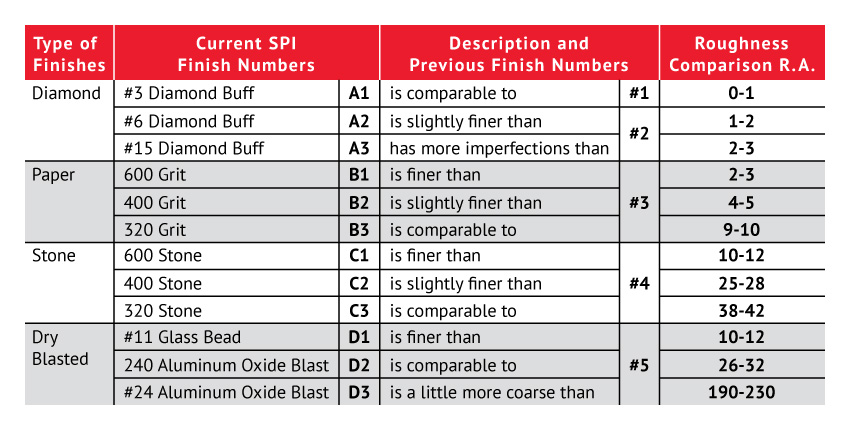
FIG 1. SPI Surface Finish: Plastics and Metal Standard Scale
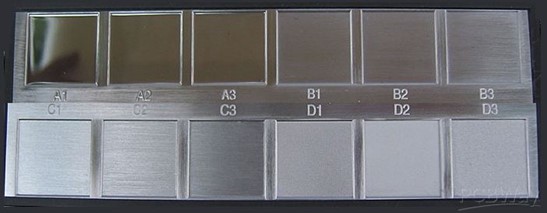
FIG 2. Examples of SPI-defined standardized surface finishes
The second most common option to add surface finish to a mold is etching with acid or a laser—the choice will be determined by the type of finish, its surface depth, and the mold material. Applied to either aluminum or steel molds, these Mold-Tech™ textures are created after milling the mold cavity and smoothing their surfaces to the requisite level.
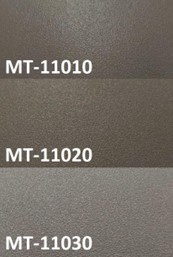
FIG 3. Common textures from Mold-Tech™, ranging from 0.001 – 0.002” deep
For light textures, a corrosive chemical is applied in a controlled way, etching the mold cavity until the desired look and depth are achieved. Protective tape masks off any surfaces that are not going to be textured.
When textures are more complex, like geometric or aggressive textures, a 5-axis laser ablates the mold material, essentially burning it away. If textures reach depths of 0.003” or greater, larger draft angles are required when the texturing is applied to the sidewalls of a mold.
A few of the Mold-Tech™ options for texturing are exemplified in FIG 3, FIG 4, and FIG 5. Each five-digit code represents a different appearance. For instance, MT-11010 presents like sand, MT-11120 resembles smooth concrete, and MT-11555 has the look of a wood panel. But there are hundreds of Mold-Tech™ specifications—even straight and curved lines, diamonds, and checkboards, as examples.
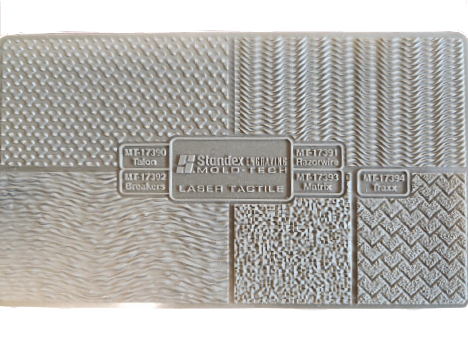
FIG 4. Mold-Tech™ texturing plaque #1
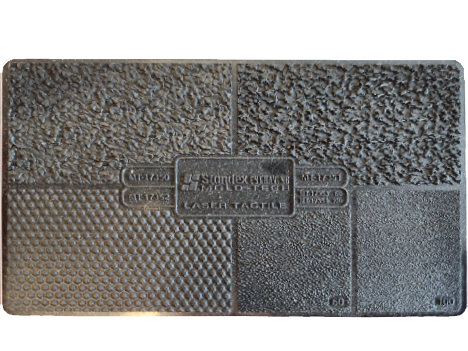
FIG 5. Mold-Tech™ texturing plaque #2
Keep in mind that texturing will likely add additional lead time to your order. To reduce project costs and keep your project timeline as short as possible, hold off on texturing decisions until the project is past the development stage. In fact, texture can sometimes be added to completed molds, if permitted by their geometry and existing surface roughness.
Finally, make special note if your textured molds are combined with fiber or flame-retardant polymers, as these materials have a tendency to generate higher surface resistance during the molding process, thus producing turbulence and drag that may affect a part’s appearance. For example, glass fibers can add a sparkly or stringy finish to a textured part, and flame retardants can lead to splay, which are whitish streaks.
Access more articles in our Plastic Knowledge Center.